

This was our dining room when we first moved in. It hadn’t been touched since the 90’s.
That fireplace just had to go and the woodchip too, it was everywhere! 😬

We knocked out the fireplace to reveal the original opening that housed the range cooker back in the day!

I wrote this blog to cover the stencilling part of my fireplace makeover.
If you want to know more on how the fireplace itself was built up then head over to Marie’s Fireplace Makeover.
But for now, let’s skip to the prep work before I started stencilling.
We smoothed out any cracks with a ready-mix concrete, applying with a trowel.

I used 80 grit sandpaper to get rid of all the major lumps and bumps, followed by a finer 120 grit paper to make it as smooth as possible for my primer.
Two coats of primer were more than sufficient.
Bulls Eye 1-2-3 Multi Purpose Primer is my go-to primer.
It’s water-based, so easy to clean and quick to dry…not too smelly either!
It is also a stain blocker which is great for water stains or when painting old stained wooden furniture.

When stencilling it is always a good idea to apply a matt emulsion base coat on top of your primer.
Primers can have a slightly shiny finish. This can lead to paint bleeding under the stencil and the paint not drying fast enough.
The paint just ‘sits on top’ of the sheen rather than absorbing into it.
I applied three coats of Jasmine White Wall Emulsion paint.

Now the painting was done it was time to stencil…tres exciting! 😃

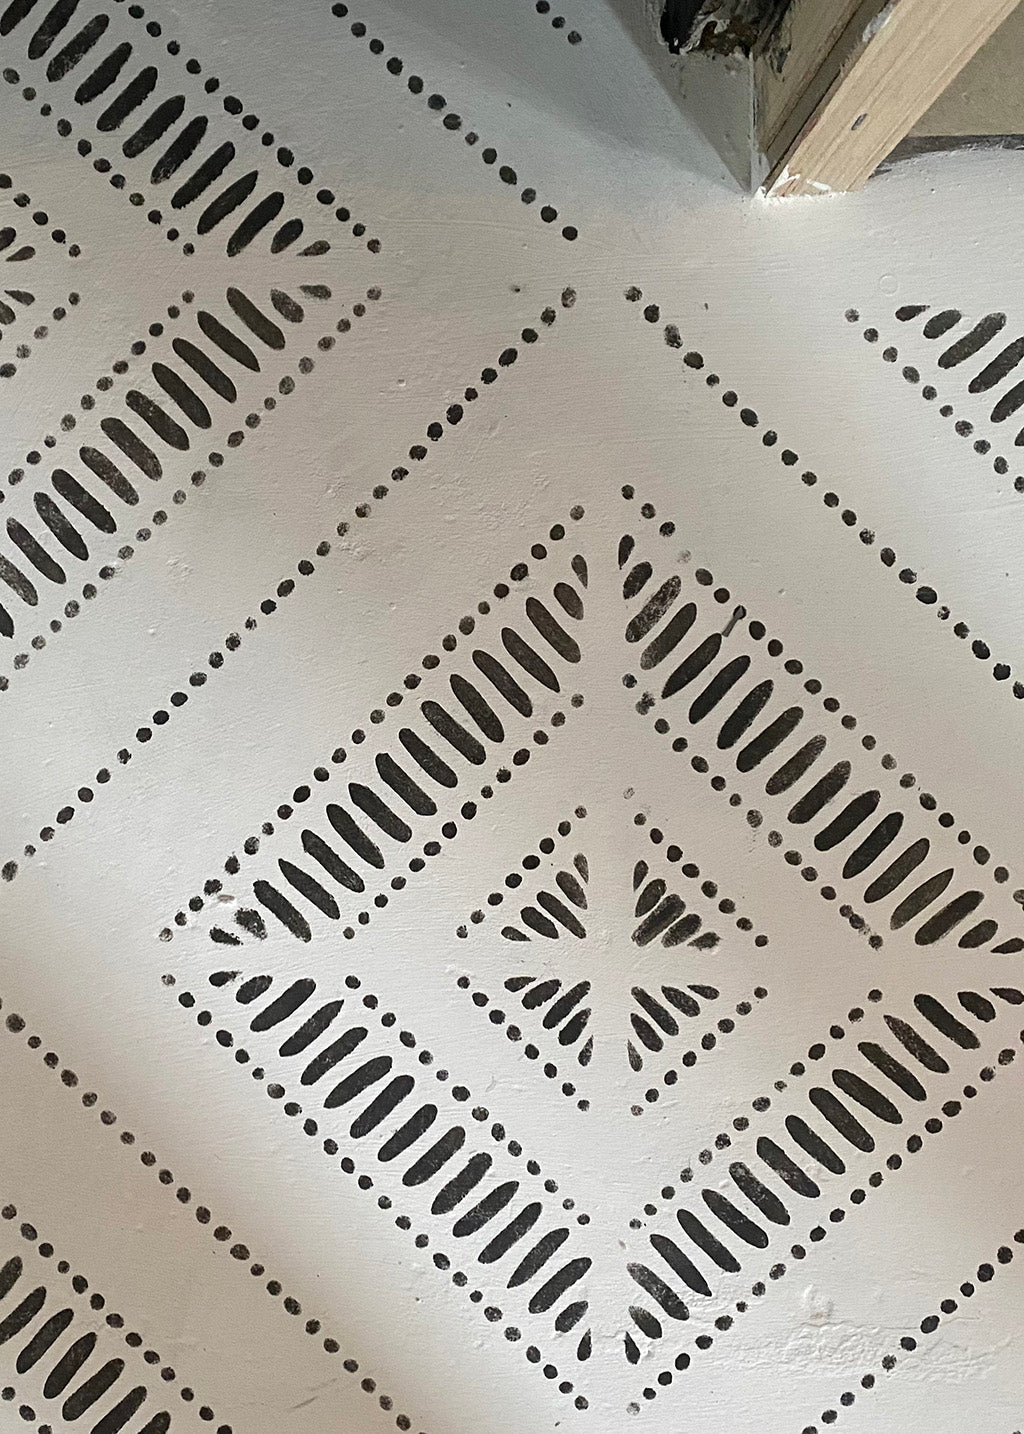
I designed a new stencil just for the job! The Bisira Faux-Tile Stencil with grout line to make it look like real tiles.
All I needed to do was work out what size tile stencil I needed.
How to work out what size tile pattern you need.
Ideally you want to have full tile patterns across the width of your hearth.
1 - Firstly, decide on how many tile patterns you want across the width.
2 - Then measure the width of your hearth. I always work in mm’s to be as accurate as possible.
3 - Next, consider the grout gaps. The grout spacing on the stencil in between the tile pattern and the repeat markers are 10 mm.
My calculations:
I wanted 8 tile patterns across, therefore had 7 grout gaps to consider. The hearth width was 1600 mm.
1600 mm width less 70 mm for grout gaps = 1530 mm. Divide by 8 and I needed a tile size of 191 mm.
We make custom sizes all the time for our customers, at no extra cost too! So just Get In Touch if you need a special size 😊

When stencilling hearths always start centrally at the front edge. Measure the centre point and mark lightly with a pencil to give you a starting point.
Use decorator’s masking tape to secure the stencil in position.

I previously upcycled an old piece of furniture with some home-made chalk paint and…yes of course…a Dizzy Duck Stencil! If you want to know more check out my blog Marie’s Upcycled Dressing Table.
I used the left-over home-made chalk paint to stencil my hearth...blog coming soon!
As my hearth was roughish concrete, I used a Large Stencil Brush for my stencilling. A foam roller is not always the best for stencilling on rough surfaces. With a brush you can stab and rub the paint into the gaps.
But don’t forget to apply the ‘Less Is More’ rule!
Don’t overload your brush or roller with too much paint. Have a piece of card or paper plate and dab or roll the excess paint off. Always test your technique out on some card or other area before starting the real thing.

Only move onto your actual project once you are confident on applying the paint.
Then just go for it!

One of the most rewarding things is peeling back your stencil and seeing how fab it looks! 🙌

To repeat the pattern, just overlay and align the stencil over the top of the previously stencilled pattern. Simples!


Stencils do need cleaning periodically. As the paint builds up it can contribute to paint bleeding under the stencil and makes blotchy lines.
Just gently rub the stencil clean in some warm soapy water. Chalk paint is nice and easy to clean off! 🧽

I had a two stencils so while the first one was drying off I carried on stencilling with number two stencil.
Once the first front row was complete, I moved onto the next row back.

From time to time you might find you go off a little bit aligning your stencil, especially when you are aligning to two previously stencilled tile patterns.
Once I noticed I was off with my alignment I didn’t stencil the whole tile pattern.
I left it and planned to go back to it at the end, paint over and redo.

But no need to panic!
All I did was aligned the stencil by eye on the next tile pattern, making sure I was keeping in line with the previously correctly stencilled row.

You can see the slight imperfection if you know it’s there!
But in the grander scheme of things, you won’t notice once the whole area is stencilled and the grout lines are filled in.

I just kept repeating the stencilling backwards one row at a time into the smaller recess.
With any tile stencilling project you always stencil the complete full tile patterns first.
Leave the edges and corners until last.

It is near impossible to keep a perfectly symmetrical pattern. As you can see my tile patterns were veering to the left! 🥴
No walls are straight so this will most likely happen but once finished and dressed you won’t even notice this…promise. You’ll see!

Once all full tile patterns were stencilled it was time for the edges.
For some parts you can simply bend the stencil and hold in place with tape and/or your hands.
A Stencil Brush or foam dabber is more useful for getting into tighter spots.


When it comes to stencilling the corners, bending doesn’t quite work out.
So it was time to cut the stencil! ✂️

This is why we offer a 2-pack on our Faux-Tile Stencils. It is always useful to have an extra stencil to cut up.
We also offer a 15% discount on 2+ items and 20% discount on 4+ items so for larger projects you can save a few pennies! 💰
Cut one edge of the stencil first just using standard scissors.

Lay in position to mark the stencil then make the second cut so the stencil fits perfectly in the corner.


This will enable you to stencil right into the corner.

Once all the edges and corners where stencilled I cast my beady eyes 👀 over the whole thing to make sure I was happy with the pattern placement.
I nearly forgot about my partially completed skew wiff tile! You can see the pattern is wayyyy off! 🥴

So first I painted over part of the tile pattern.

After applying three coats I then aligned the stencil to where I was happy with the pattern repeat and just stencilled again.

Et voila! All sorted now! 👍
Now I was happy with all the tile patterns it was time to add in the grout lines.
I aligned the grout stencil by eye along all the gaps in between the tile patterns and used the same Stencil Brush to apply the paint.

For the paint, I used some left over Taupe Chalkwash Paint by Rustoleum which I’d used on my walls.

To create a mottled grout look I blended the Taupe paint with the home-made chalk paint I used for the stencilling.

I overlapped the stencil with previous grout pattern to make sure my grout lines were seamless.

I left the awkward spots until last and cut the stencil to fit

We had never used grout stencils before with our Faux-Tile Stencils.
I was super excited to give it a go and was certainly not disappointed…looks like real tiles! 👌

All I needed now was to get the Hubby to put some trim around the edge of the hearth and add some dressy bits and bobs to finish it off.


1 comment
Hi I’ve just brought a stencil from you for my bathroom floor which is tiled! What the best water proof paint that’s not going to wash off when I clean it?
Thanks
Claire