

This dressing table has just had its third makeover!
It’s been passed around and painted a few times by Jasmin and me, but never before had it been stencilled. Seeing as we run a small family business selling stencils it was a no brainer that it should get the stencilling treatment!
Deciding on a pattern is always a tough decision, we have so many to choose from. But in the end I decided to create a new design inspired by a cushion I bought from Home Sense, my fave home accessories shop by the way guys!
Of course, the new design will make its way into the Dizzy Duck shop. We created a Mali Furniture Stencil and a Mali Wall Stencil. They will be available to buy later this week!

Supplies
This is what I used for the project:
Sand paper – medium grit
Chalk Paints
Chalk Paint Brush
Stencil (Dizzy Duck’s of course!)
Stencil Brush (again, Dizzy Duck’s!)
Decorators tape
Rustoleum Clear Finishing Wax
Wax Brush
Lint free cloths

Prep
We always tell our customers to never skip on good prep. It’s the make or break for a good finish!
So, I removed the drawers and everything was sanded down with a medium grit sandpaper. Then I hoovered up all the dust and ran a clean cloth over the surfaces, ready for painting.

Paint
I love using chalk paint on furniture. The texture and how it sands down to a lovely smooth finish is just so lovely 😊
There are lots of chalk paint brands on the market, but I actually like to make my own. It means I can use colours that are already existing in my interior scheme and it’s super easy to make.
All you need is some calcium carbonate powder (I bought mine off ebay), water and paint. You gradually add water to the powder to create a sloppy paste. Then you add paint.
It takes some experimenting until you get the right proportions, but you can make your paint as thick or as thin as you want for your project.
If you would prefer to buy the paint then have a look at the queen of chalk paint, Annie Sloan. Rustoleum also do a Furniture Chalk Paint. I have used both paints in the past with great success.
Colour choice
When it came to colour, I wanted to steer away from the paler, more romantic tones and decided to go dramatic, black and bold! I wasn’t sure it would look right on a traditional Victorian piece of furniture, but went for it anyway 🤷♀️.

The first coat went on and I still wasn’t too sure, it looked a bit wishy washy. So, on went another coat and then I totally knew I had made the right choice 😊

Stencil
Rick laser cut the new Mali Furniture Stencil for me and I dug out my Dizzy Duck Large Stencil Brush, eager to get cracking!
Now sometimes less is more, so I decided to only stencil the drawer fronts. I secured the stencil in place with some pieces of decorator’s masking tape and got my stencil brush and white paint at the ready.


Now the most important thing to remember is not to use too much paint when stencilling or you will get splodgy blurry lines, which nobody wants! Remove any excess paint off your brush onto a paper plate or spare piece of card.
You can either dab with a stabbing motion or lightly rub the brush over the stencil to apply the paint. Only apply light coats until the desired coverage is achieved. It is always wise to practice first before letting loose on the real thing!


Shabby Chic
When it comes to upcycling furniture I am a big fan of the distressed look. It will certainly disguise any possible bumps and scratches better. Not only that, it fits my personal interior style too!
If you too are a fan of the shabby chic look then all you need to do is grab the sand paper and get shabby-ing! Concentrate on all the areas that would naturally get worn over time such as any corners and edges. You can always build on it, but you can’t take it away, so start in small areas with light sanding until you find your desired finish.


Seal
On all my upcycled furniture I like to use wax as a sealer. It has such a lovely feel and finished look.
For all my projects I tend to use Rustoleum’s Clear Finishing Wax.
I usually wait until the day after the stencilling has been done before applying the wax to give the paint chance to dry and cure. I apply with a wax brush, then buff up afterwards with a lint free cloth.

Accessorise
Now no interior is complete without a little (or a lot!) of faffery! Anyone who knows me knows I love plenty of accessorising. I think it just adds personality to a space, makes it feel lived in and homely.
Firstly, the original handles on the dressing table had to go. I didn’t think the cut glass knobs suited its new dark, geo, boho look. So I headed over to my ‘go to’ shop for furniture knobs, Knobbles and Bobbles. They have so many designs to choose from, I had a hard time whittling it down to one!
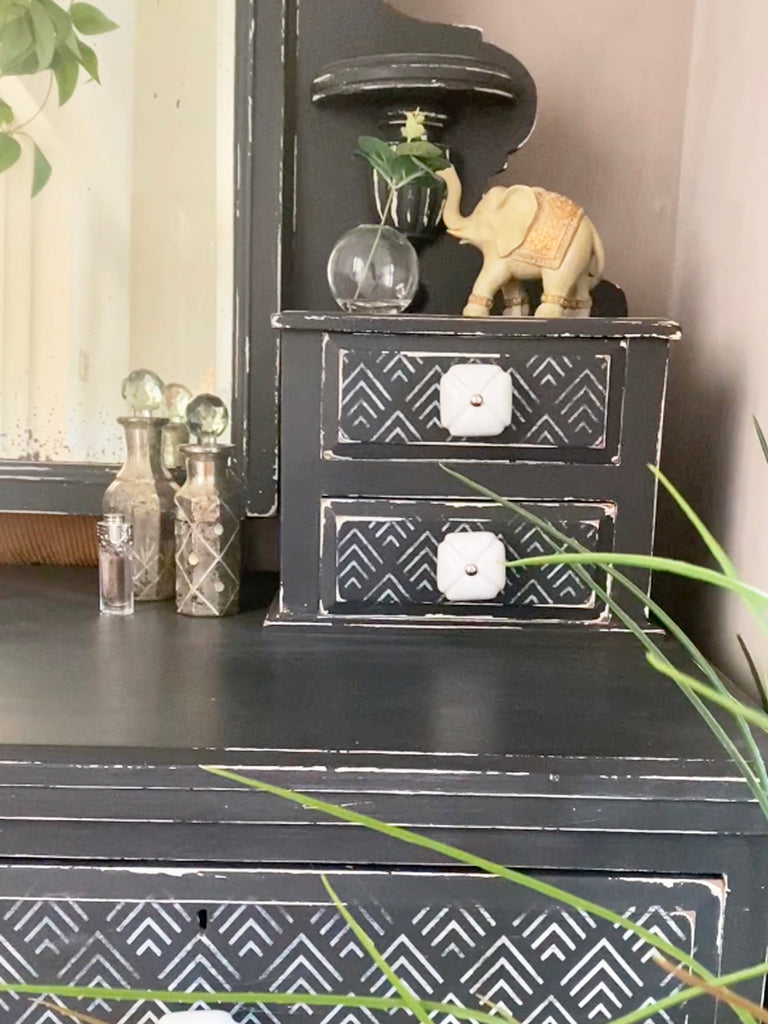
Eventually I chose a White Art Deco ceramic knob that was really in keeping with the geo/art deco vibe of the stencil pattern. They contrast so nicely with the black and accentuate the white stencilling.
Then it was time to add some faffery. A cute White Resin Bird Ornament from Dunelm Mill, a little elephant ornament gift from Jasmin, and some old glass perfume bottles I had hanging around.
My fingers are nowhere near any shade of green whatsoever, so of course there’s a couple of appearances off faux plants too! Lol

